1. Overview of the Food Link by United Way BC .
The Food Link by United Way BC app provides a structure to identify food needs and to have those requests met by donations from food providers in the three regions of Surrey, North Okanagan, and Upper Fraser Valley.
Terms:
Food Requests
- The primary driver for this solution will come from those organizations that provide food to those in need. The Food Recipients will enter the food requests and the system will search for matches.
Food Donations
- Food Donations are the food that is available from Food Providers to match the requests of the Food Recipients.
Community
- Food recipients will comprise food pantries and those organizations that deliver meals and food directly to those in need.
Suppliers
- Food providers may be grocery stores, farmers, or food banks that have a donation or provision of food that is intended to serve those in need.
Volunteers Transportation Providers
- Transportation of food orders can be offered by the Food Provider, Food Recipient, or a third-party individual that volunteers for jobs that will be posted on the app.
Orders
- When a Food Request is matched to a Food Donation, the resulting match becomes a Food Order. Food Orders will also create Transportation Opportunities that can be filled by the Provider, Recipient, or third-party Volunteers.
Transportation Opportunities
- Transportation jobs will be those orders that have not yet had an assigned transportation provider.
Food Categorization
- T1 - Produce, Dairy, Meat & Seafood
- T2 (Dairy Example) - Milk & Cream, Eggs, Cheese
- T3 (Milk & Cream Example) - Whole Milk, Reduced and Nonfat Milk, Flavored Milk
Food Tags
- Tags are used to indicate different qualities of food items including ethnicity, dietary, storage or tools required, and will be a binary representation of either on or off.
Units
- Unit will essentially only specify either weight or volume units such as Kilo or Single Unit. Food items will include an option to set the default Unit so the screens will automatically populate with the representative Unit but can also be overridden by the user.
Unit Size
- Will either be a choice of Kilo or a number of single units.
Mobile App Functions:
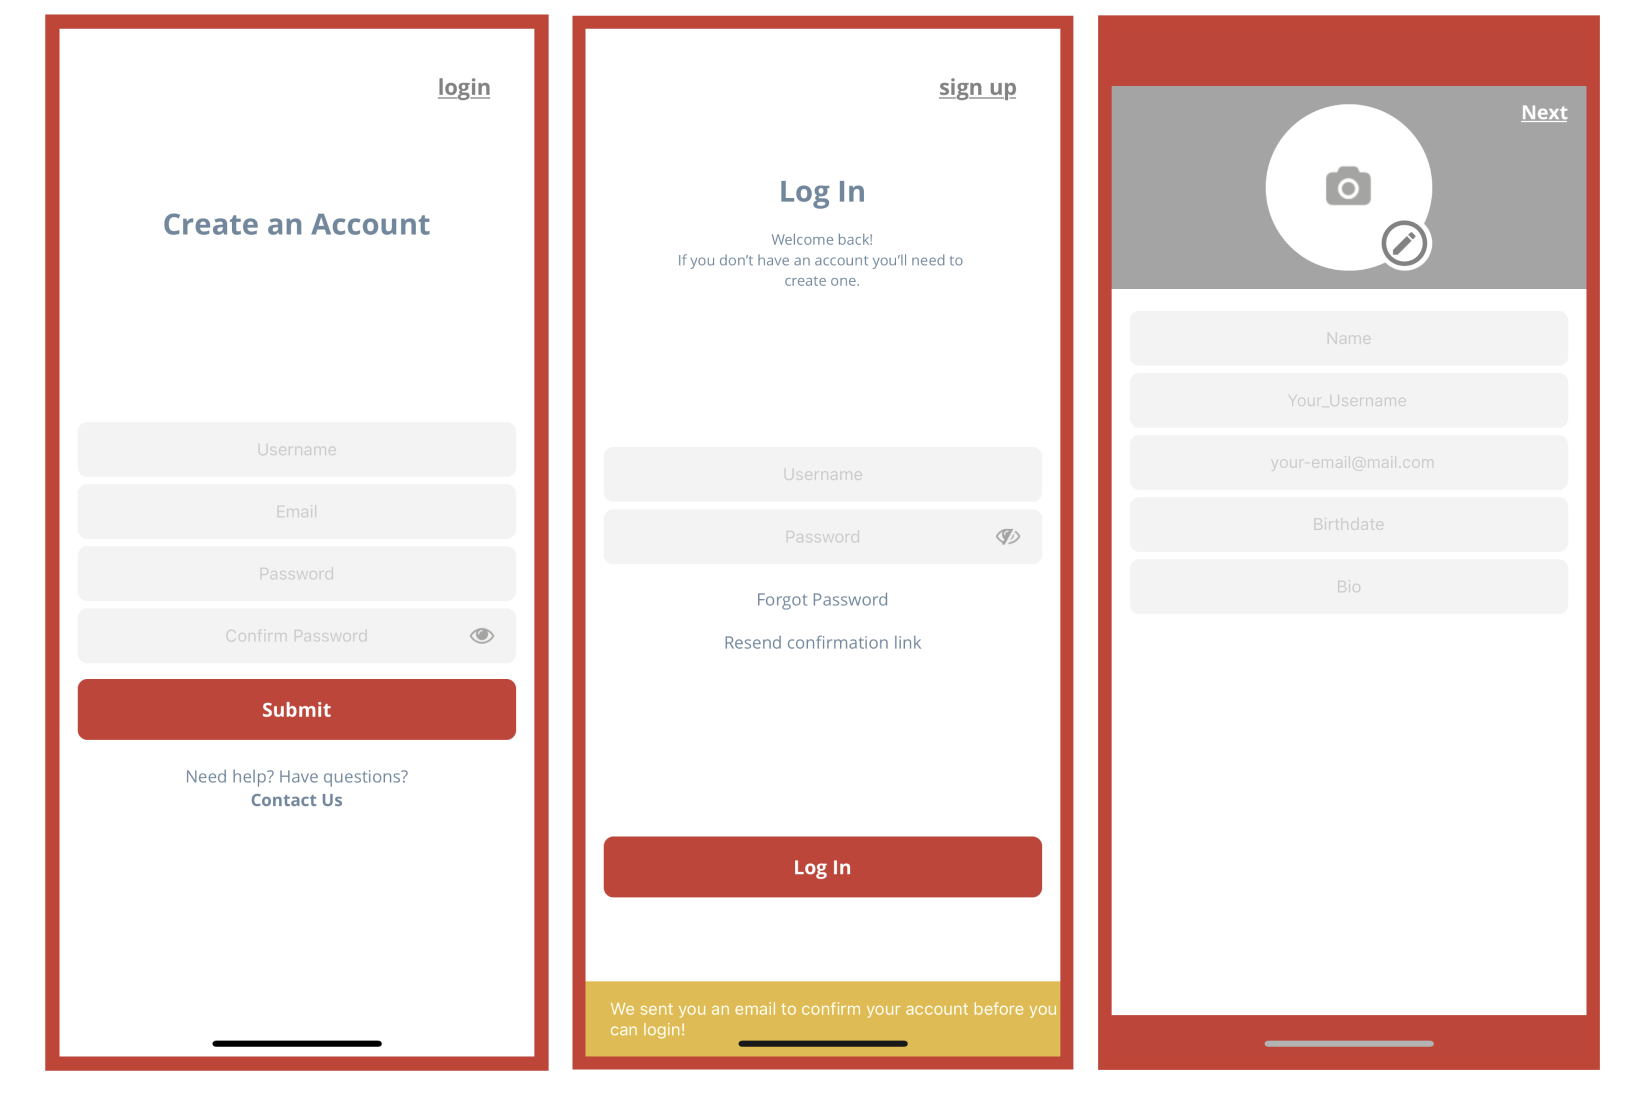
Onboarding
- Once the app is downloaded on an individual’s phone the Individual user will register themselves. The first screen explains what the app does and ends with an opportunity for the user to either log in with an existing account or to Get Started by creating a new account.
 User Registration
- When a user is new to the app, they must register.
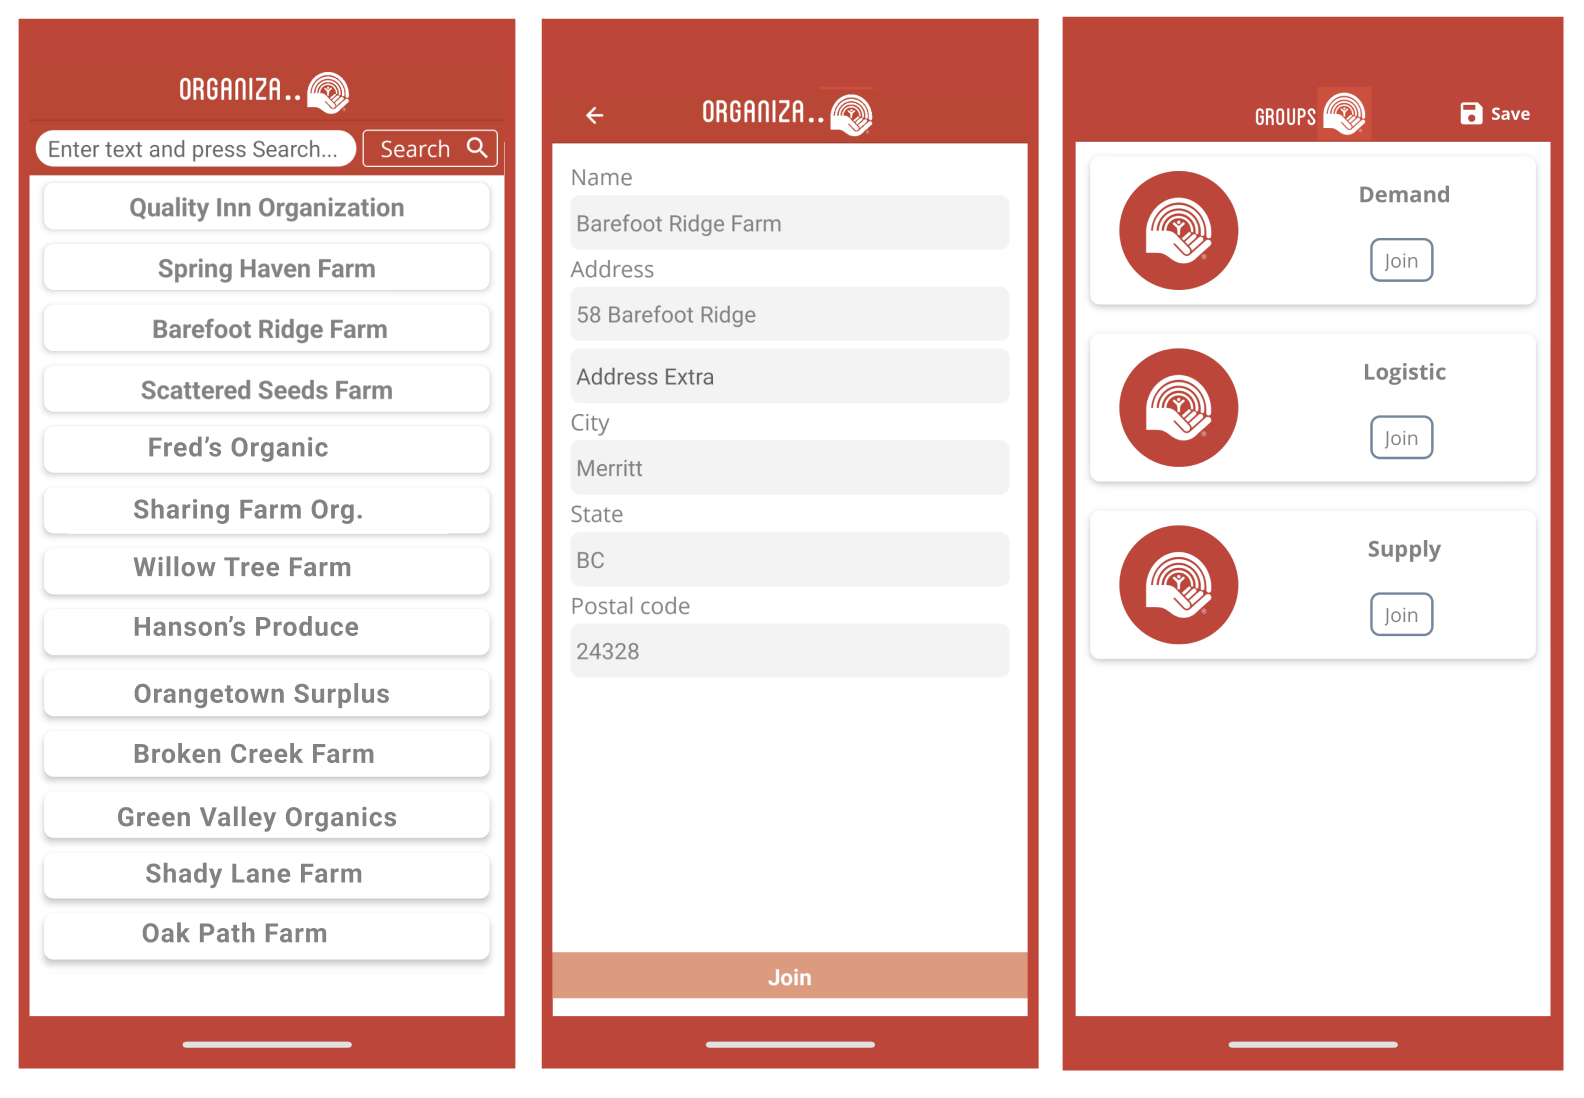
- The Username / Email Address will be the primary identifier of a user in the system. A list of organizations will be preloaded in the database and users can self-identify as a member of a pre-loaded organization.
-
- Users will be sent a verification email before being able to sign in.
- Users will need to specify a password to access the mobile app and you can reset passwords via email.
- Users will be required to enter their full name and birthday as age limitations apply for apps.
- Organization - Select from the list of organizations. Once selected the next screen will come up with the address and a join button on the bottom. This will be the organization you are tied to determine reasonable matches for food delivery.
- Role - Users will adopt the roles of the organization if one exists. If a user does not identify an organization, they can self-select their roles and in most cases, will be a Logistics or Transportation Provider. This is done by joining one or more of the three groups.
-
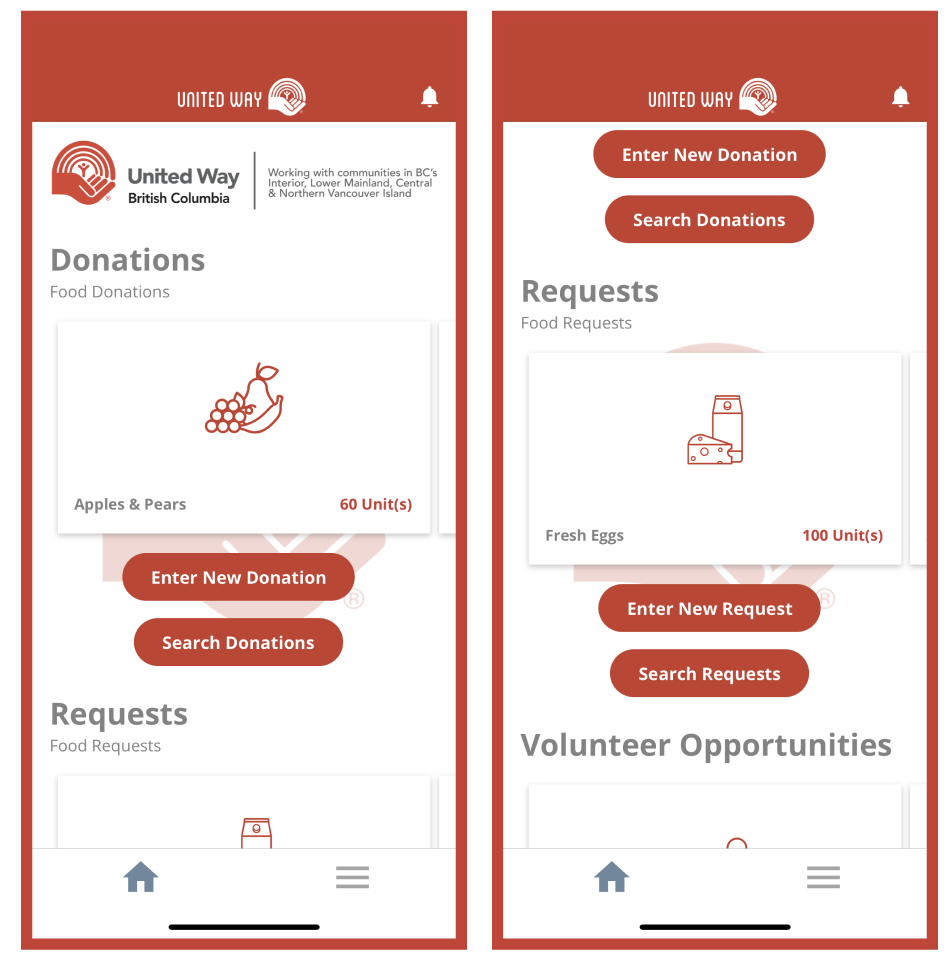
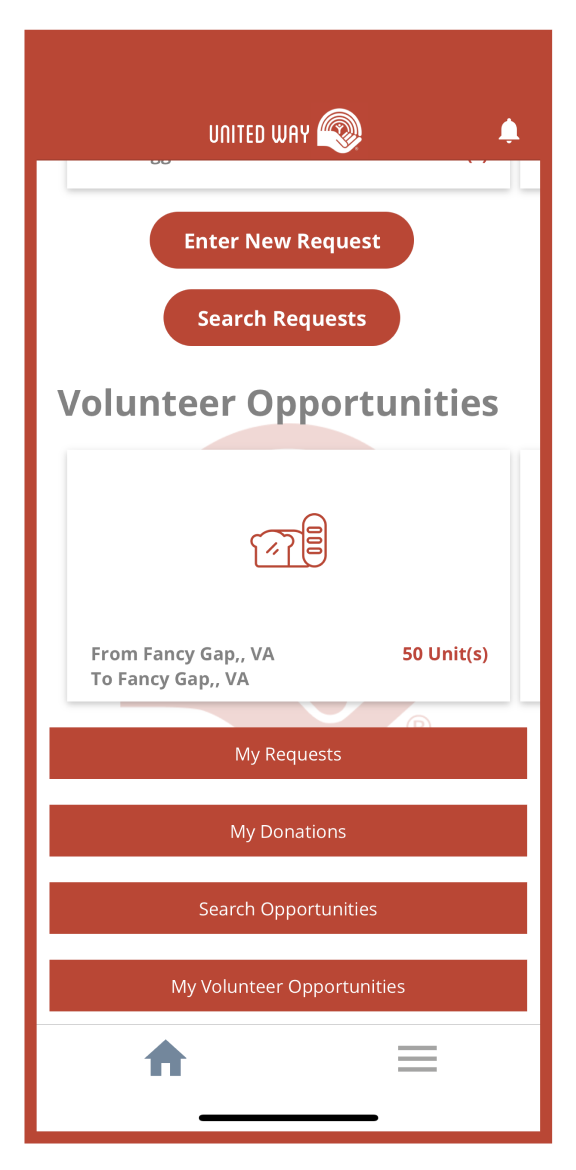
Home Screen
- Once a user completes the registration process, they will be presented with the home screen. The Home Screen will have different features based on the role(s) selected by the user.
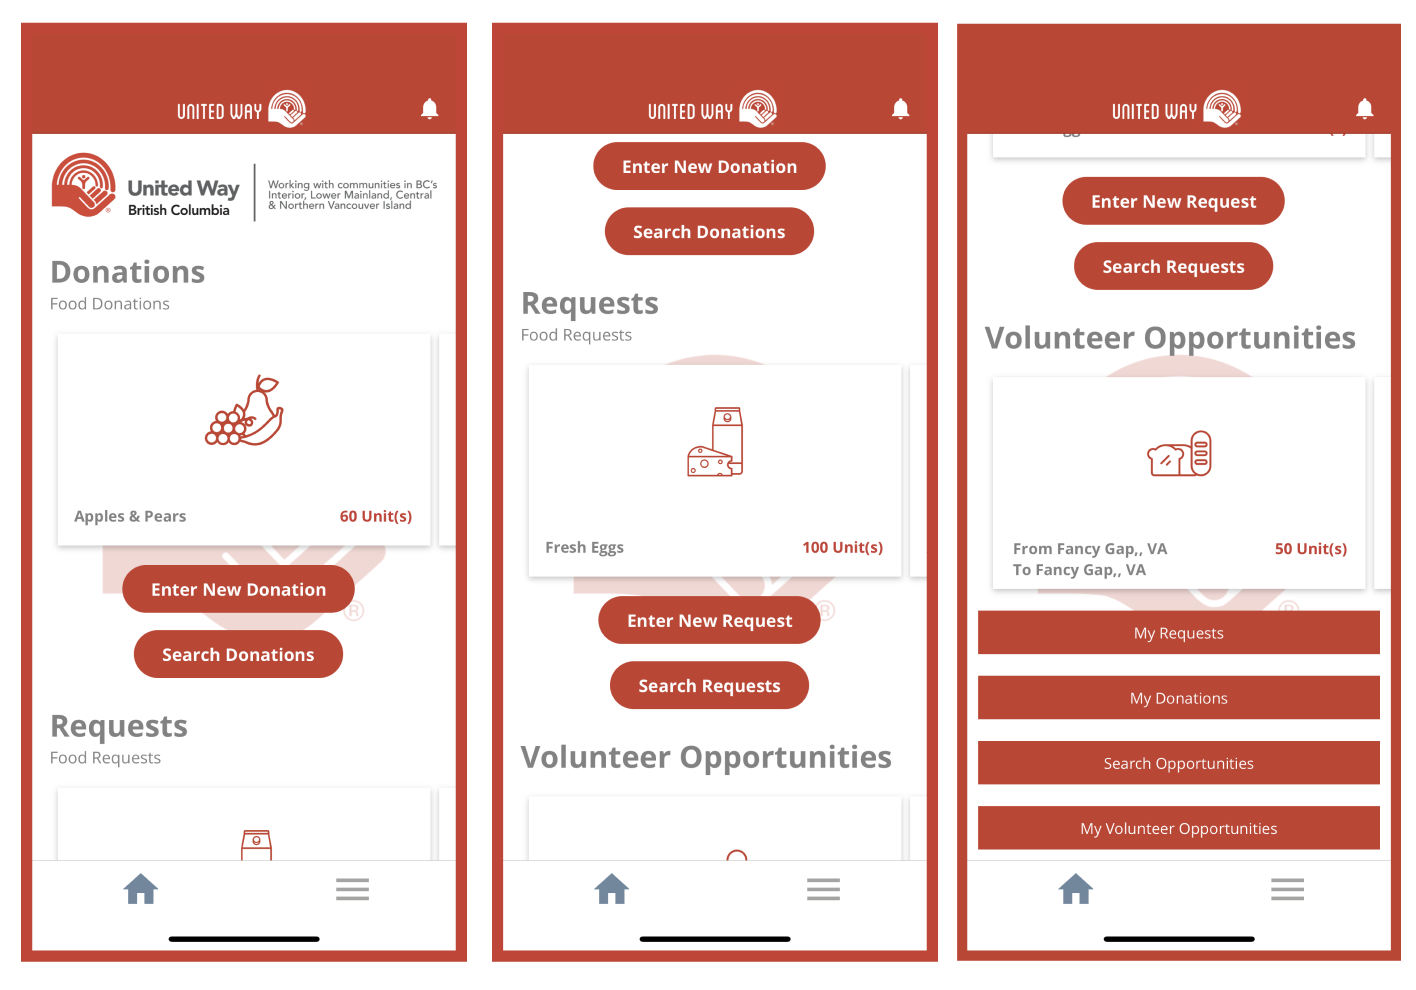
Food Requests and Donations
Food Requests
- The food requests section of the home screen will appear for those who selected the role of Supply so they can see the requests and make a determination of whether they can fulfill that request. The carousel will display the items that have been requested by the Recipients and will be sorted by those that are located nearest to the Provider.
Food Donations
- The food donations section is a mirror of the requests section of the home screen and will appear for those who selected the role of Demand so they can see the donations and make a determination of whether the donations could fulfill their requests and claim them. The carousel will display the items that have been offered by the Providers and will be sorted by those that are located nearest to the Recipient.
- A recipient can also Search for Donation or Enter a New Request.
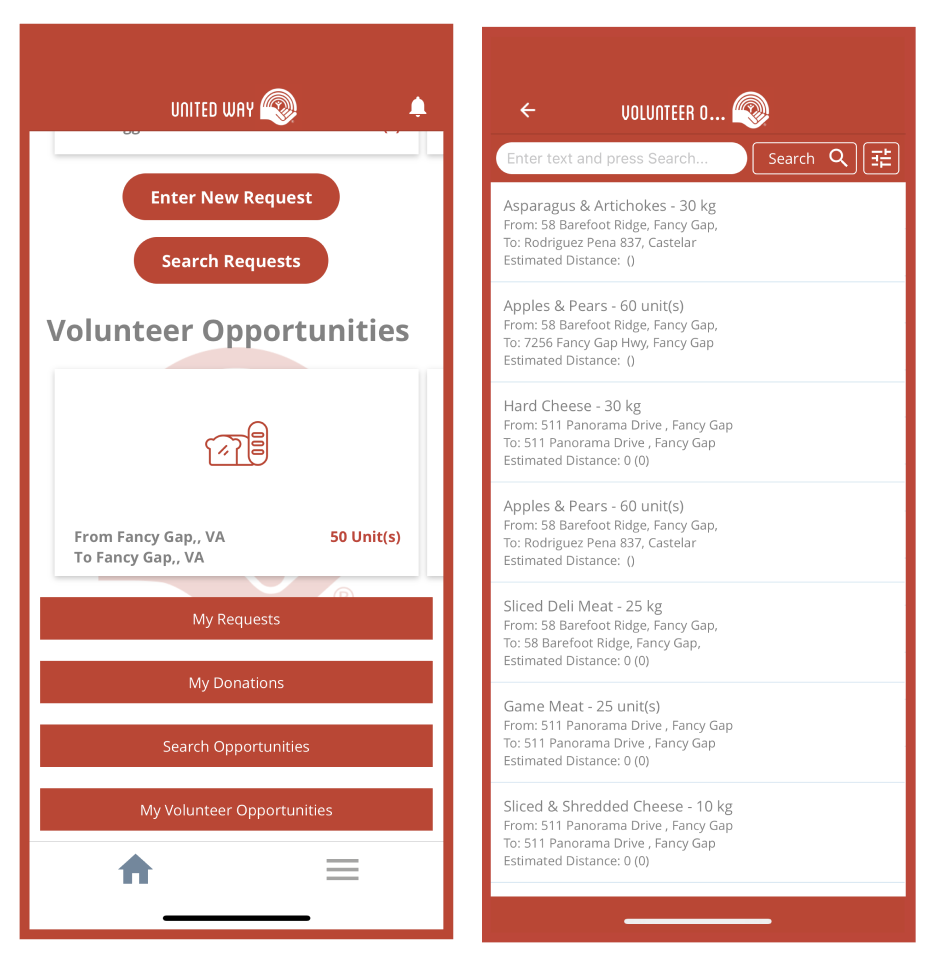
 Volunteer Opportunities
- For those who selected the Logistics role, a volunteer opportunity carousel will appear on the home screen. The opportunities will be listed by those where the origin or destination is closest to the user’s address when they registered. Volunteers can also Search for Opportunities.
Supply Functions
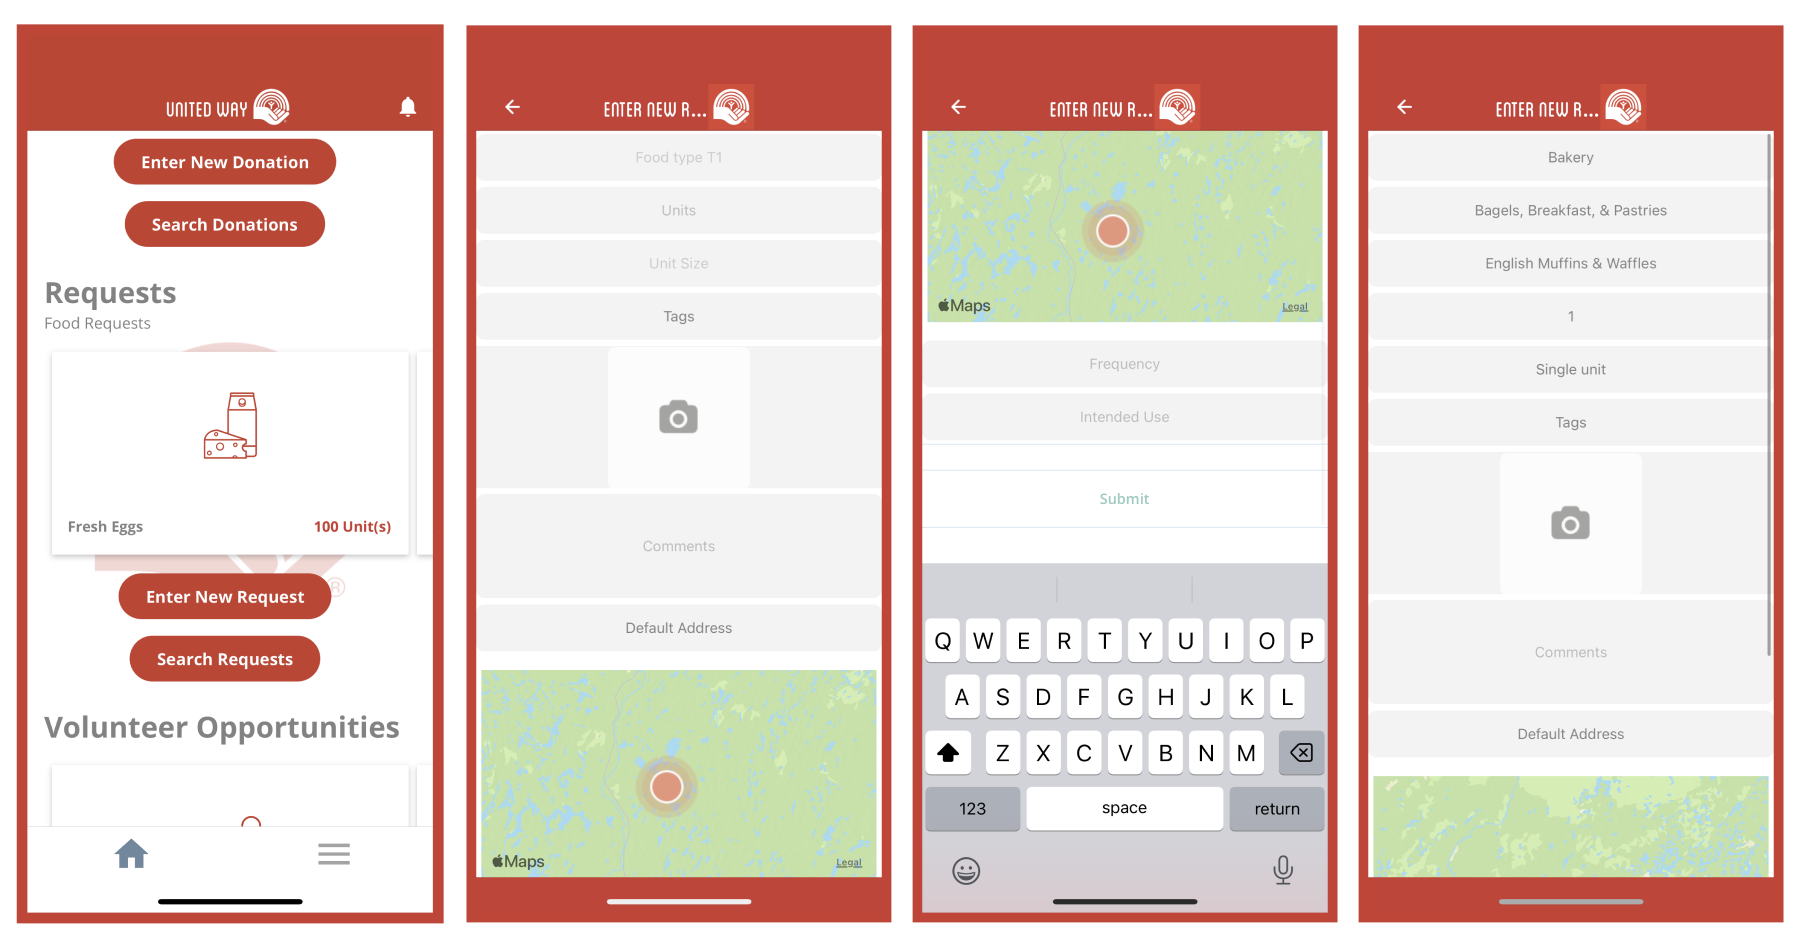
Enter New Requests
- Food recipients can enter new requests within the app.
- Food Types will progressively filter the following Food Types. First, select a T1 then T2 will appear then once T2 is filled in T3 will appear. Items will be shown in alphabetical order. On the drop-down of any TLevel, the user can enter a few characters and the resulting list will filter to only show those with a “prefix” of those characters (consider doing a contains).
- Users will not be able to specify items more detailed than T3, but they can include additional details in the Comments section. Comments will not be searchable.
- Units, Unit Size, and Quantity can be filled in per the definitions section above.
- Tags Button - This will display a list of tags that the recipient may require for the provision of food.
- Users will be encouraged to take a photo of the items they desire. While this is more important on the provider side as the photo will explain what is available, a recipient can also photo the product they desire. This will make use of the photo capabilities of the user’s phone. Note that MilkCrate nor the app can control the quality or availability of the camera on any user’s phone.
- Comments are a free-form text field where any details can be included.
- Location/Distance is a way for the Recipient to specify the limit they want the system to look for qualifying donations.
- Frequency - How frequently will this order be needed?
- Intended Use - list what the order is going to be used for.
- Submit - When the submit button is pressed, the system will immediately look for matches to the request. In most every case, a list of possible matches will be presented. If there is a match that meets all the criteria, the user will be presented with a match found and give them the option to accept or deny the provision.
Tags
- When entering a new request, the Recipient can press the Tag button and select all the tags needed to limit their matches to specific criteria. Pressing the OK button will return them to the entry of a new request.
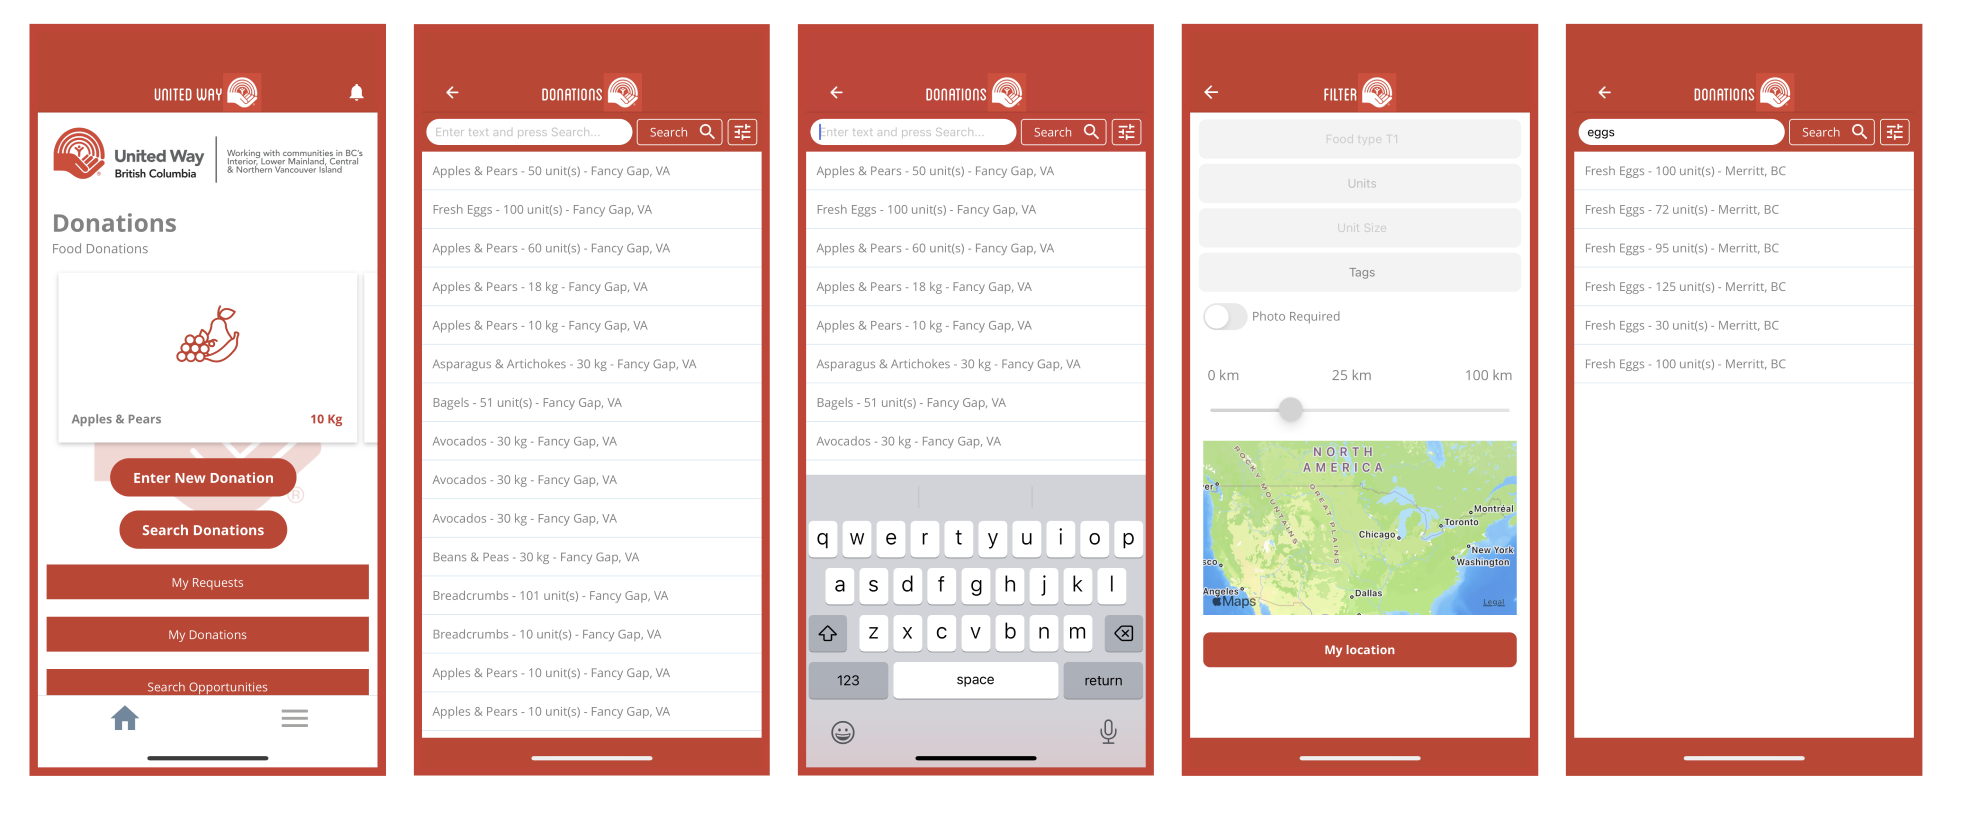
 Search for Donations
- Recipients may find the need to select from what is available from suppliers as their requests may not have found a match and they may have to find food necessary to feed their population. Pressing the Search Donations button will display a list of donation items available (not previously matched or put on hold) in order of those closest to the Recipient.
- Filter Search for Donations
- When the Filter button is pressed at the top of the Search Donations screen, the following screen is displayed and will allow the Recipient to filter their search based on the food type and location criteria.
- Food Types will progressively filter the following Food Types. First, select a T1 then T2 will appear then once T2 is filled in T3 will appear. Items will be shown in alphabetical order. On the drop-down of any TLevel, the user can enter a few characters and the resulting list will filter to only show those with a “prefix” of those characters (consider doing a contains).
- Units, Unit Size, and Quantity can be filled in per the definitions section above.
- Tags Button - This will display a list of tags that the recipient may require for the provision of food.
- The photo required will enable the Recipient to specify only those Donation items that have a photo as there is a greater success rate for an actual match based on the photo and interpretation by the Recipient.
- Location/Distance is a way for the Recipient to specify the limit they want the system to look for qualifying donations.
- Pressing My Location allows the Recipient to place their current location as opposed to the location recorded for their organization and search for donations nearby. This feature is useful if the Recipient has driven to one pickup and wants to find another donation that might be near their current location.
- Pressing My Organization centers the organization address as the search center.
Match Found
- When the system finds a match on the immediate entry of a food request, the following screen is displayed.
- The user will have the option to respond as follows:
- Pickup Hours - These will be static hours for the week (no variation for the full calendar year schedule) when pickups can be made at the Provider. The user can select this button to determine if their hours would be a fit for any pickup that could be performed by the Recipient.
- Image - The photo displayed will be that of the Provider (if one is available), not the recipient's request.
- Decline - Should the Recipient decide to not accept the match they can press the X button, or the back arrow.
- Claim - this will bring up the pop-up window prompting the user to accept.
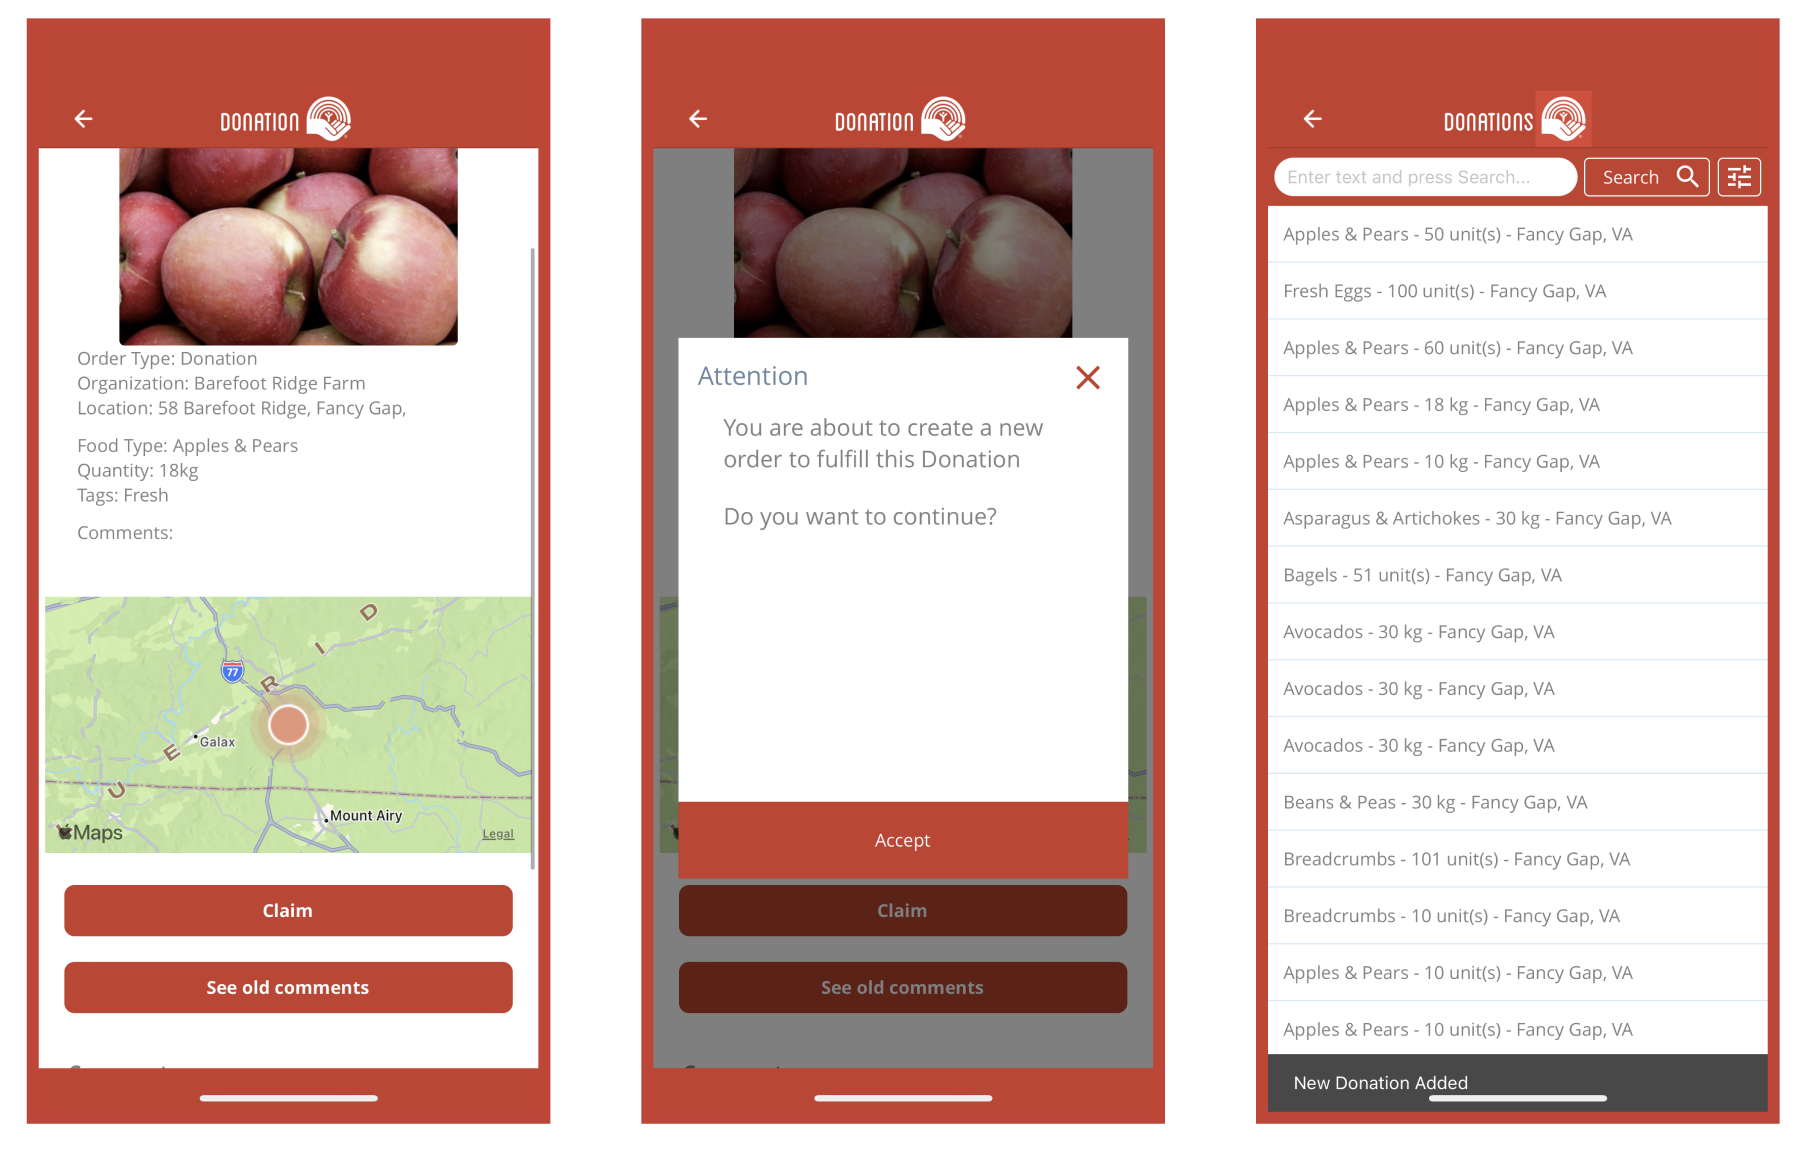
Accepted Matches can be found in the "My Requests" section of the app:

Match Not Found
- If a match was not immediately found the request will sit under My Request. When a potential match comes in a push notification will be sent and user will have option to accept or deny.
Provider Functions
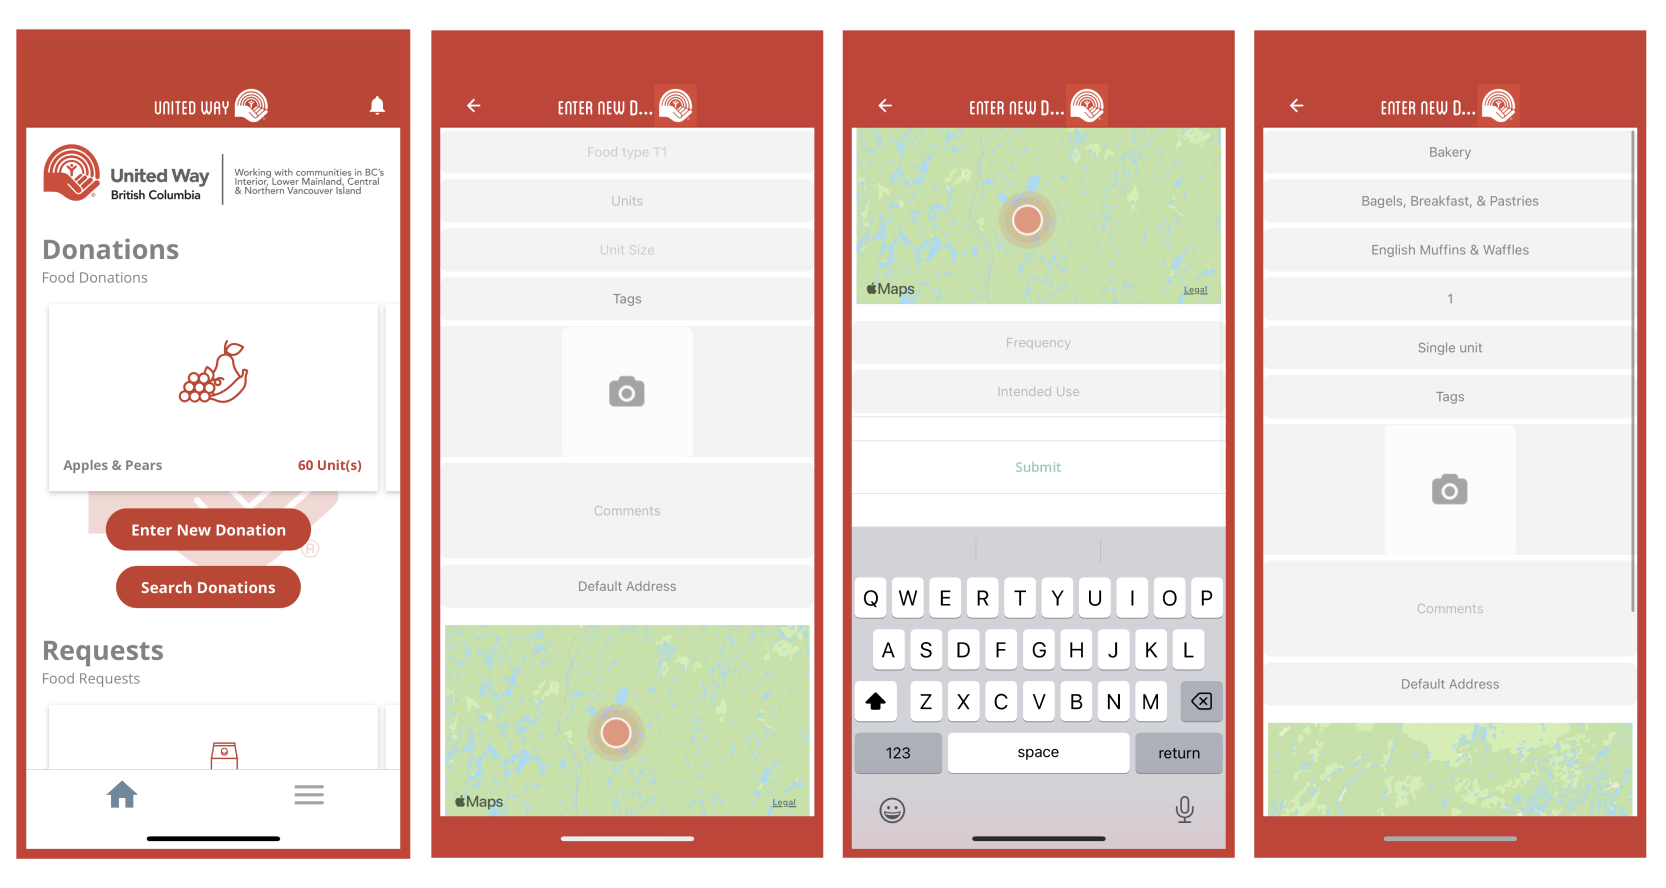
Enter New Donations
- Food Providers can enter new donations within the app. When pressing the button on the home screen, the following screen is displayed.
- Food Types will progressively filter the following Food Types. First, select a T1 then T2 will appear then once T2 is filled in T3 will appear. Items will be shown in alphabetical order. On the drop-down of any TLevel, the user can enter a few characters and the resulting list will filter to only show those with a “prefix” of those characters (consider doing a contains).
- Users will not be able to specify items more detailed than T3, but they can include additional details in the Comments section. Comments will not be searchable.
- Tags Button - Will display a list of tages that the recipient may require for the provision of food.
- Units, Unit Size and Quantity can be filled in per the definitions section above.
- Users will be encouraged to take a photo of the items they desire. While this is more important on the provider side as the photo will explain what is available, a recipient can also photo the product they desire. This will make use of the photo capabilities of the user’s phone. Note that MilkCrate nor the app can control the quality or availability of the camera on any user’s phone.
- Comments are a free form text field where any details can be included.
- Location/Distance is a way for the Provider to specify the limit they want the system to look for qualifying donations.
- Option - Consider having a flag indicating that the Provider will deliver.
- Submit - When the submit button is pressed, the system will immediately look for matches to the Request . In most every case, a list of possible matches will be presented. If there is a match that meets all the criteria, the system will notify the Recipient that a match was found and give them an option to to accept or deny the provision.
Transportation Volunteer Functions
Search Volunteer Opportunities
- In addition to scrolling the carousel of volunteer opportunities on the home page, the search for opportunities button can be pressed showing those opportunities in a list sorted by those where either the origin or the destination are closest to the address for the volunteer as entered on their registration.
- For a deeper search, the volunteer can press the Filter button at the top of the screen.
- Filter Volunteer Opportunities
- When the Filter button is pressed, the following screen will be displayed.
- Distance to Start - This drop down will provide a maximum distance to search and it is recommended that the following ranges be used, 10, 25, 50, 100km and unlimited.
- Journey Distance - This field allows the volunteer to filter those opportunities based on a maximum distance between the origin and the destination and similarly the ranges should be similar to those as Distance to Start.
- The map image will show different pins for both the volunteer’s location as recorded at registration (blue) and pins for the start (green) and end (red). If possible each possible volunteer opportunity could draw the route between the origin and the destination.
- Volunteers can also filter based on the Space required. Space of orders will be approximated and will require that the T1-T3 items have an estimated volume (if the items are defaulted to weight) so that the system can calculate approximate liters or sq meters needed in a vehicle for an order. Lastly, the volunteer can indicate whether to filter out those items that require refrigeration or to request whether to show them as the volunteer may have a means to keep items sufficiently cold.
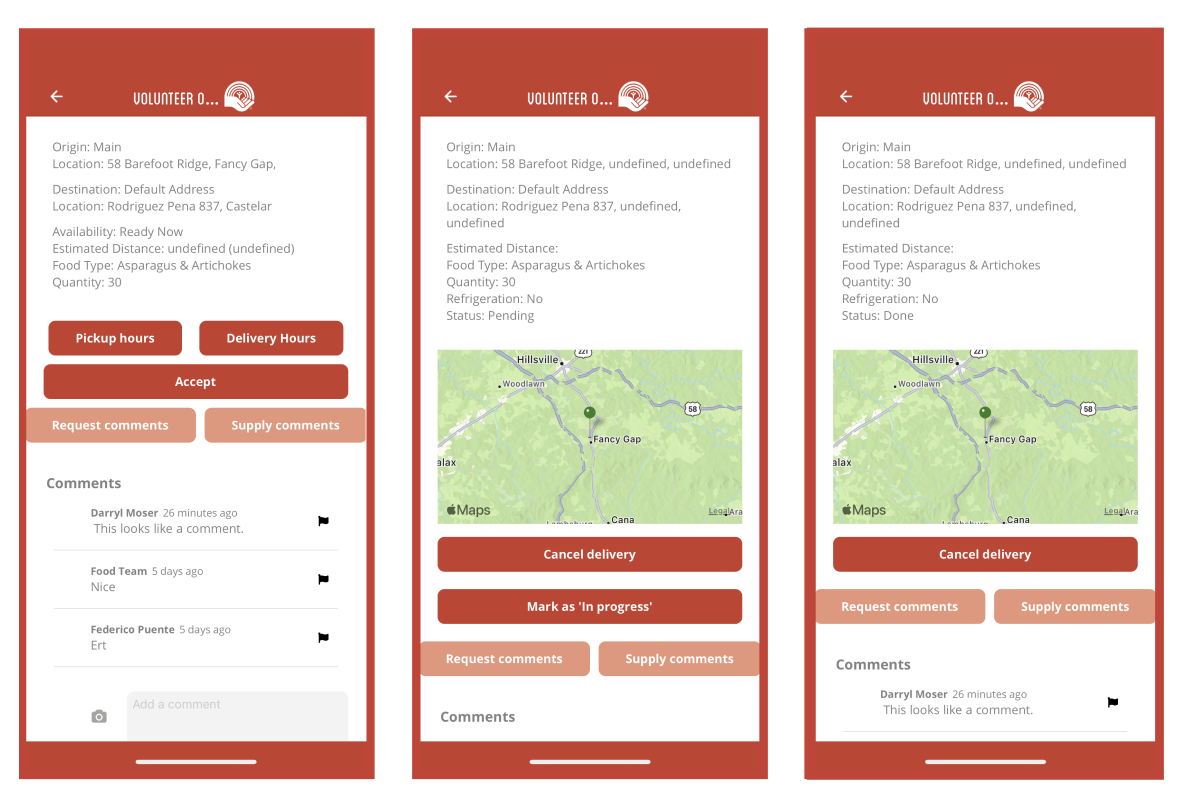
 Volunteer Opportunity Details
- When a volunteer selects an opportunity to review. The following screen is displayed.
- The origin and destination address details. These items can be clicked to show full details of the location.
- The order details are also included.
- Buttons to show the Pickup and Delivery hours are also available and the map showing the origin and destination.
- The volunteer can press the Accept button to claim the opportunity and the system will remove this opportunity from selection by others.
- After accepting the opportunity, the volunteer will be taken to a screen where they can click the address of the Origin and launch their navigation tool on their phone (Waze, Google Maps) to navigate to the origin.
- Upon arrival at the Origin, the volunteer can press a button to confirm pickup. They can then press the address of the destination which will then route them via their navigation tool on their phone.
- At the destination, the volunteer can press a button indicating delivery completed.
 Delivery Needed Notification
- When a Provider enters a new Donations or a Recipient enters a new Request, the system will search for a match. If a match is found and the Provider/Recipient also offers delivery, a notification will show as below:
- The user can Accept that the Provider will deliver and the confirmation page that shows to a volunteer is presented to the user where they can click on the destination to allow their phone to navigate.
- Additional consideration must be given to how a user might assign the delivery to another person within their organization.
- Users that are a part of the Provider organization that also offers delivery can see and claim the transportation opportunities as part of their employment at the Provider. Coordination with their manager and the time of departure is not managed by the app.
Delivery and Pickup Hours
- The system will support the entry of a fixed week of hours (full schedules with holidays is not supported in the MVP). These hours can be displayed in a calendar format as follows.
- From this screen, a volunteer or driver for the Provider or Recipient can confirm a time they expect to either perform the pickup or delivery. It is not required but can be chosen and if selected can be indicated on the Order.
Related Articles
2. Food Link OnBoarding Process
The first screen welcomes you to the app with the logo. The user is prompted to either "skip" or "swipe to begin". Both will take you to the sign-in/create account page. On this screen, the user is asked to set up an account. If they do not have an ...Home Screen Ticket (How to Complete)
Table of Contents Overview Daily Polls Block Challenges Block Goals Block Leaderboard Block Link Block Headers & Images Block Spacer Block Survey Block Categories Block Built by MilkCrate Block Sub Screens Overview Our blocks make it easy to ...4. Enter New Request/Search Requests
Enter New Request: Users can enter new requests within the app. To do this, press the "Enter New Request" button on the home screen, and the "Enter New Request" screen will be displayed. The request screen will be blank; you will have to select ...3. Enter New Donation/Search Donations
Enter New Donation: Suppliers can enter new donations within the app. To do this, press the "Enter New Donation" button on the home screen, and the "Enter New Donation" screen will be displayed. The donation screen will be blank; you will have to ...Inviting Potential Users to Test Your App
Table of Contents Overview Step 1: Request Participation Step 2: Meet with Participants Part 1: State the purpose and duration of testing Part 2: Give participants access to the app Inviting iOS testers Inviting Android testers Step 3: Collect & ...