Geocoding a Location
Geo-verification means we can with 100% accuracy say that a user actually visited the location in question. Our system stores the specific latitude and longitude for all of your physical events which is why we require the full address and for you to confirm its location on the map in the Admin. We then place a perimeter around that specific location that blocks any users that are outside of that perimeter from checking in.
What should be check-in radius? The radius allows you to block users form checking in if they are outside of the radius, our default radius is 800ft. Each user can only be pin pointed to a 10ft level of accuracy. This means if you set a check-in radius of 100 ft the user might have difficulty especially if it is a large building, so keep it above 800ft.
Why can’t my users check-in? If a particular user is unable to check-in it is probably because they have not enabled their location services with their provider. There are instructions for users in the app settings but the quickest way to have our system process the request again is for a user to delete the app and redownload. Don’t worry the user my log back into their account using the same username and password. Once they login again the app will request access to their location. Users only need to give access while using the app for the places feature to work.
Adding an Event
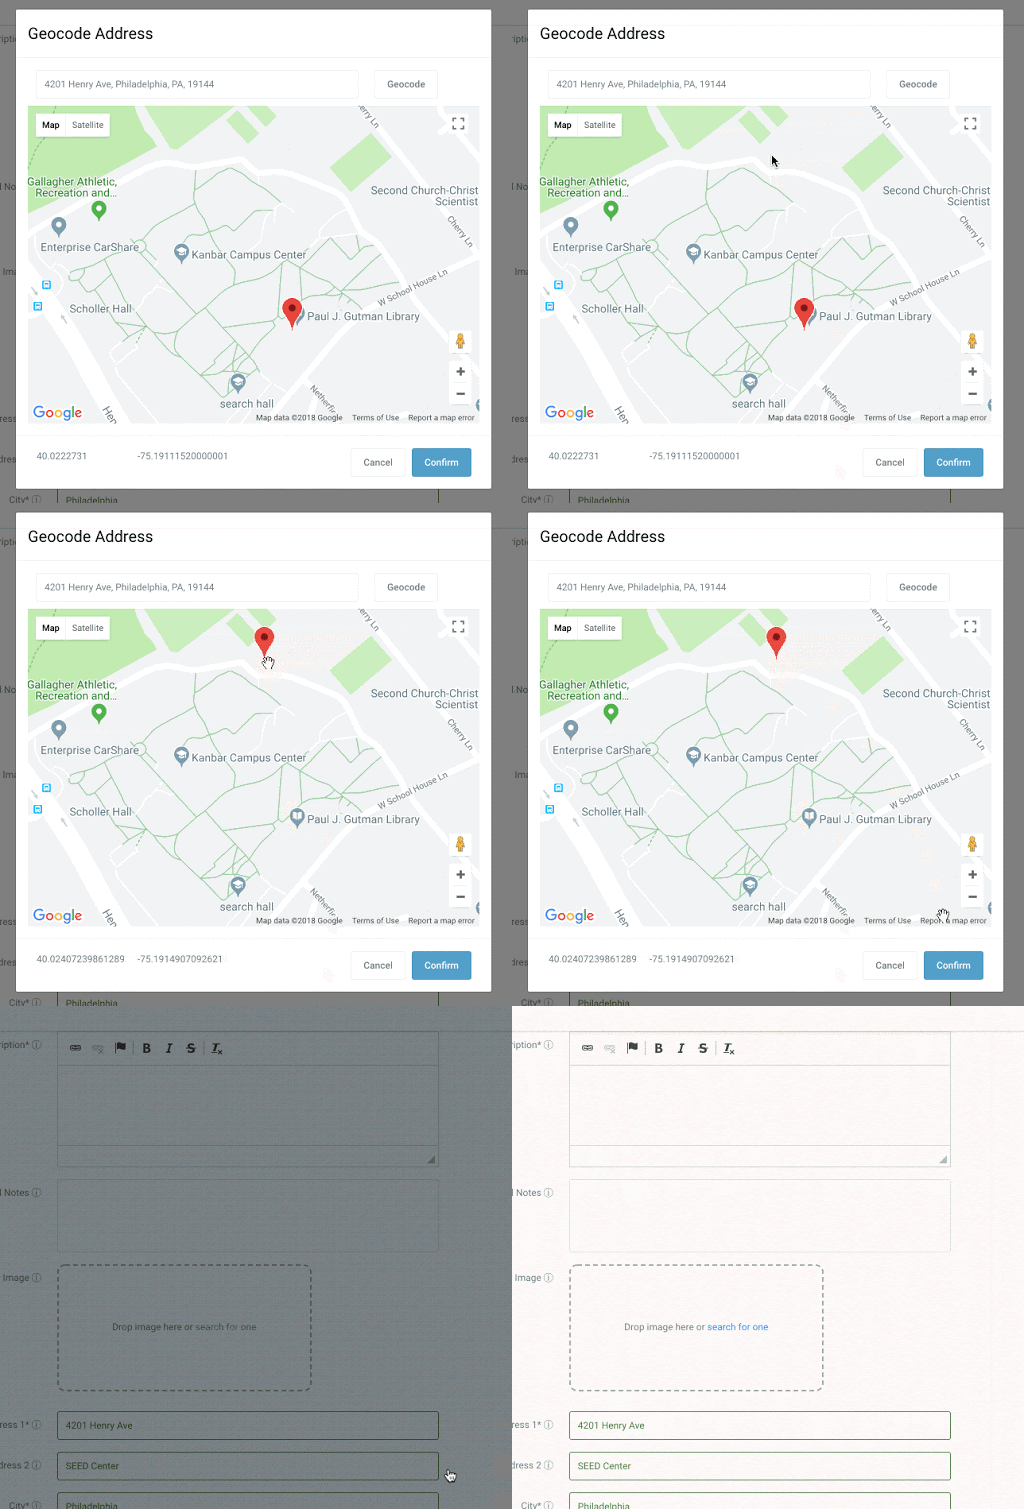
Some Places you want to geocode may not have an address, or may be just one of many parts of an address. For example: a school football field, a room within a building, a park, etc.
Follow these steps to geocode the types of Places above:
1. In the Address field, type in an address that is most closely associated with the Place and hit the Geocode button.
2. A map will appear with the location pin over the address that was entered in the previous step. Use the "+" to zoom into the area.
3. Drop the pin on the desired point in the area, simply by clicking on the desired point. Select Confirm when complete.
4. Now, the Latitude and Longitude will reflect the new point selected.
***IMPORTANT***
Once you have changed the pin point of the geocoded location, clicking on the Geocode button again will RESET the location point to the original address. Please note that you will have to then have to reselect the desired location point.

Related Articles
All fields within a Location explained
Enabled Toggle Typically you will keep your locations enabled, that way the user can see it! If you have a location that is not ready to be shown to users because you aren't finished writing up the description or wanted to create a place holder keep ...Event Fields Explained: Event Types (In-Person)
When creating an event one of the fields required is the "Event-Type" field. This functionality breaks events down into four sub-types of events—two in-person event types and two virtual event types. This article we will be focusing on the two ...Places
Table of Contents Overview Places Fields Map View/ Category View/ Place View Step-by-Step Instructions How to geocode a location Overview Our places and map feature allows you to store all the places that your users should be able to check-in at, ...Profile Config
Profile Bio Role Industry Users can select their industry from our default list of industries. The users industry will display on their profile. Organization Let users share their business name or other organizational affiliation. User can select ...What profile fields are available?
What profile fields are available? Race Age (required) Gender Zip Code First & Last Name (required) Alias Email (required) Role Bio Industry School School Year Organization Location Social Links Race Our current race options are limited and single ...